Thursday, March 24, 2011

Little Bronze Wooden Box

I bought this little wooden box at the thrift store and thought it would be a great project to "re-do". When I bought it I could tell it was a child's box used for holding crayons and markers. It was bright blue and had wooden bugs on the drawers. It was probably cute when it was new, but it was ready for the dump when I found it.
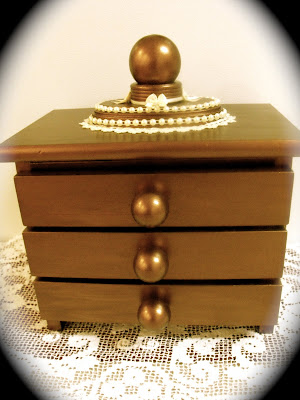
After cleaning it up (which took a lot of work) I added the wood pieces to the top. It just needed a "little something". I also replaced the bug wood pieces with the round knobs on the drawers. Next I painted the whole thing pink, drawers and all. I looked at that pink for weeks and weeks and decided it Would Not Do! So I tried painting it a Gleams ivory. That just looked streaked, even after several coats, so I eventually ended up painting it this shiny bronze. Seemed to be the best choice for this box. The inside drawers are still pinkish ivory. I added the creamy lace, pearl and bow accents on the top to jazz it up a little.
This box is now available for sale at Aunt Elsie's gift shop in Gardner Village, Salt Lake City. I also took up the green box (below) and filled it with hand-painted Easter eggs, similar to the painted egg I posted earlier on this blog.


Tuesday, March 8, 2011

Just a little green box

After adding the white stripes, I started with the pink parts of the rose buds, applying a darker shade at the base. This was followed by the leaves, some shading, then the stems and curly stems. Ta Daaaa!
The first task was to clean up the box and add several coats of green paint. There were a lot of flaws to hide.

This is the little old wooden box I found at a thrift shop. It looked pretty sad.


Monday, March 7, 2011

Wall decor with paint

This is a doorway coming into my kitchen. The wall just needed some color so I painted this design. It's always fun to paint vertically - NOT! It would have been SOOOO much easier to paint on a flat table surface then stick it up there, but alas, this is what I did instead. Someone told me they thought I had put butterfly stickers up there. Not so. I truly painted those critters myself......vertically!

Painted Gourd

A while back I discovered gourd art. Here in the southwest gourds grow fairly well. We grew some of our own and this is one I painted. Patience is the key word with gourd art. First, they take most of the summer to grow. Then they have to be completely dried out. I usually waited about a year for the drying time. The best way to tell if it was dry was to listen for the seeds to rattle when I shook the gourd. Cleaning the outside was very time consuming. I would work outside because it's a messy project. Keeping a bucket of warm water nearby, I would use a knife to scrape off the skin after I had dipped the gourd in the water. It would take repeated dips in the water and lots of scraping. Once it was completely clean, I'd let it dry out a few days before painting. I used regular acrylic paints for the flowers and leaves, followed by edging the petals and leaves with a wood burner. That's what the black lines are from. Challenging to say the least. When I was satisfied with the project I applied a light coat of satin water-based varnish. I really like the original colors of the gourd. The top was cut off, and I trimmed a large cork to fill the space. I took out the seeds and replaced them with dried beans. This adds weight and helps stabilize the gourd to keep it upright. Seems to be working pretty well. If you have any questions about this craft I'd be happy to answer them.